Showing posts with label empress barrettes. Show all posts

Sunday, November 11, 2012

Japanese Maple Leaves and Their Stems


It's been so long since I posted anything! So sorry. I want to thank everyone for all the lovely well-wishes. I'm feeling MUCH better! Yep, I have kidney disease, and I spent a fair amount of time in the kitty hospital, but I'm doing pretty well, now. I have a special new low protein diet, and Helen has to give me subcutaneous fluids twice a week. I'm not enjoying that process, BTW, but what can I do? We might be able to reduce the frequency if my blood numbers show progress at my next veterinary visit. The doctor was very impressed last time.

OK, so it's fall, isn't it? If Helen and I had had more time last month, we would have talked about this earlier, but better late than never.We both love Japanese maple leaf kanzashi. They're just so pretty. But you know what, in almost every example I can find, I don't like the leaf stems.....I'm not going to show you pictures, but typically, stems look awkward, pasted on, not organic. I don't know....I asked Helen if she could come up with something better, and here's a little mini-tutorial to show you Another Way.

All you accomplished kanzashi-makers will know that to create a Japanese maple leaf, you want to make 5 or more long skinny petals. Helen likes to make 3 of about the same length for the middle of the leaf, and 2 more a little shorter for the outer part of the leaf. Now, about the stem.

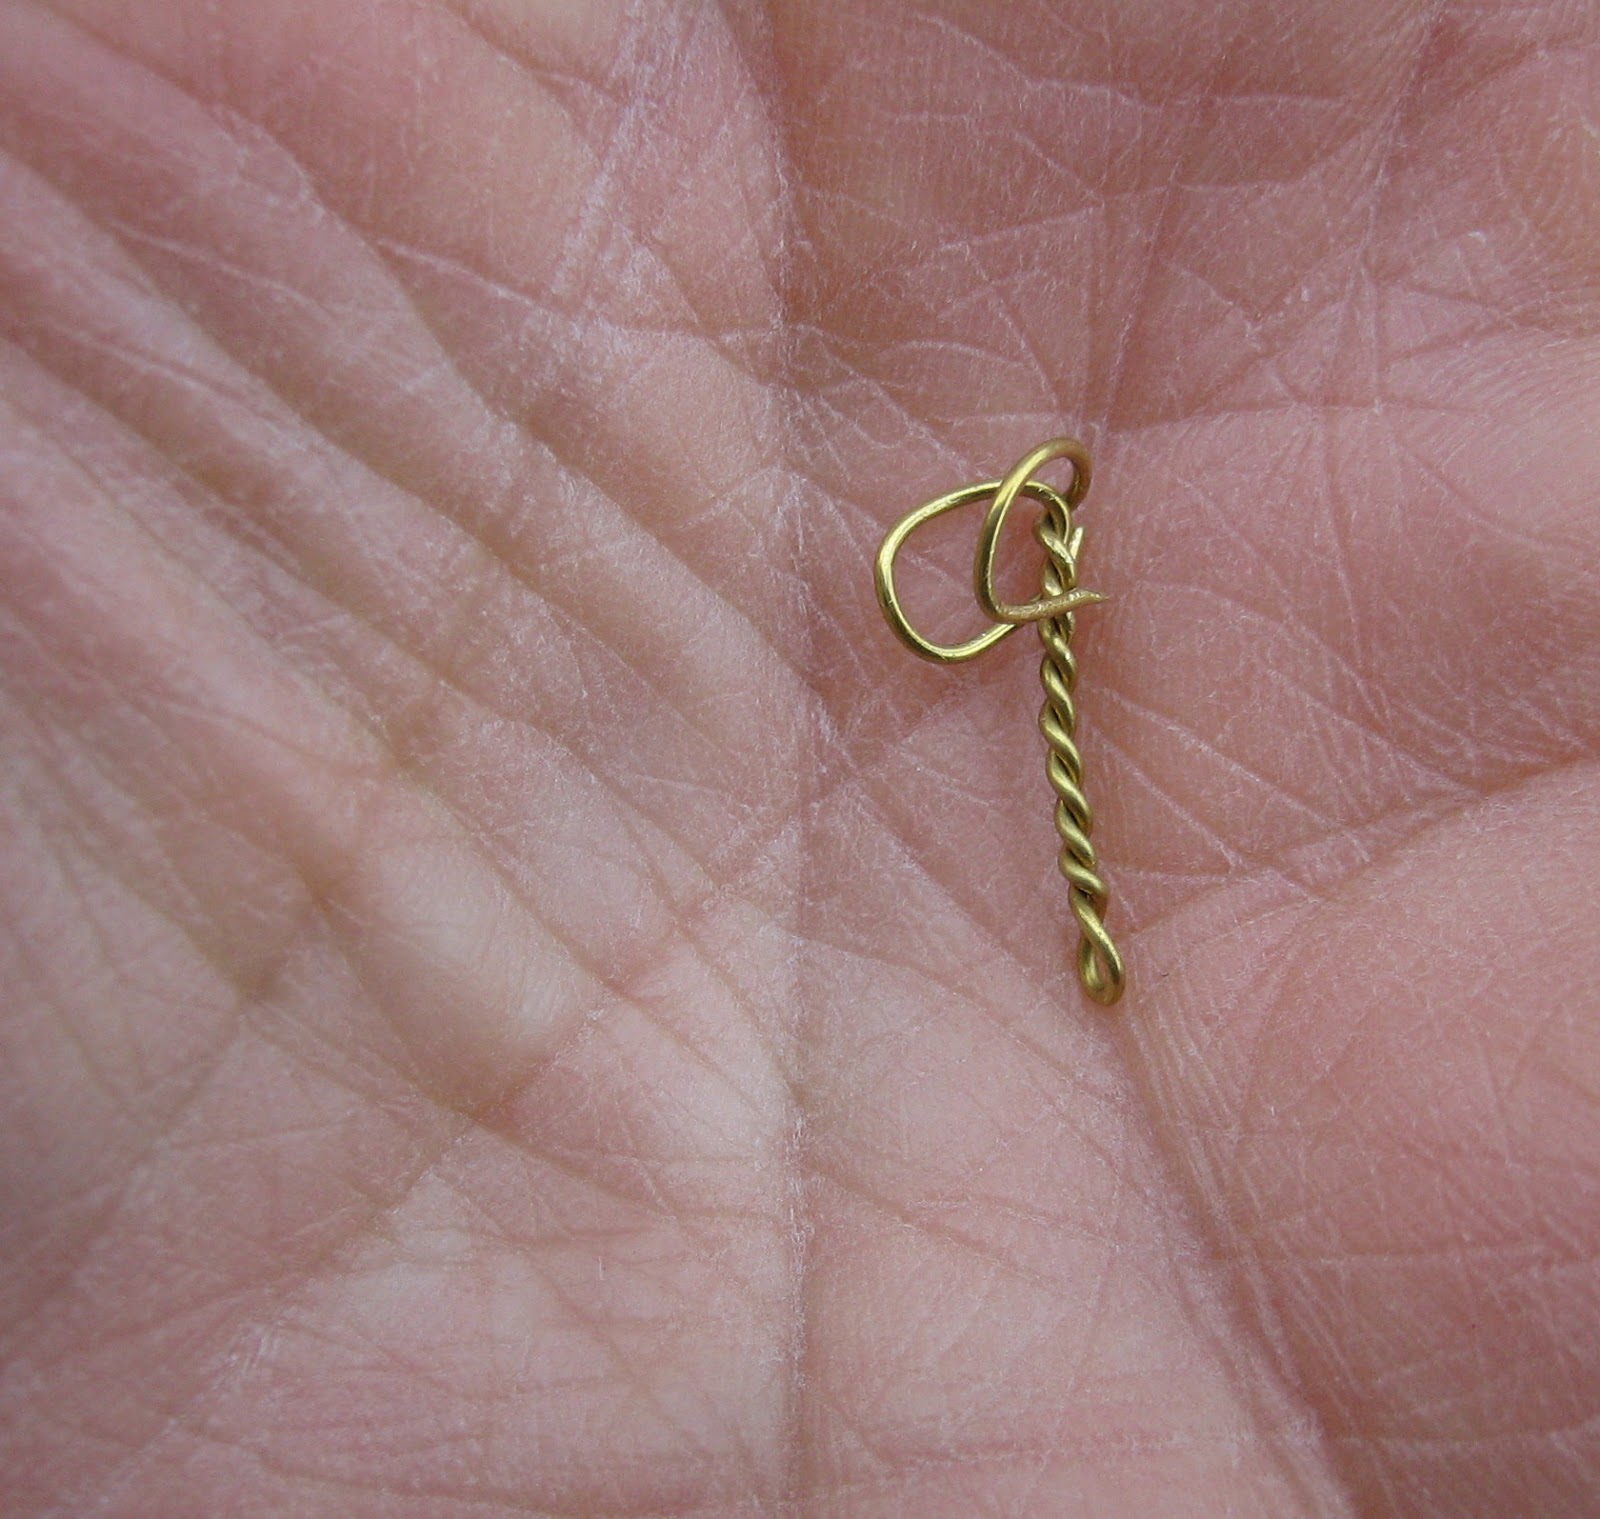
Try this: cut about a 3 inch piece of wire and twist it from the center, like this...


making loops with the ends, and folding them together, like this...


Now that you have your loops, you can sew them to the center "lobe" of your leaf....simply insert the lobe (petal) inside the folded loops. Sew as you would a "hook and eye" type fastener. The stem part of the wire is on top of the leaf, like this...

 
Here's a side view....click for bigger!


All right, now put together the rest of your leaf. Helen sewed on the middle lobes and then glued the outer ones.....it might have been OK to glue all of them. The reason she did some sewing was because she was unsure about what bead to sew at the base of the leaf, and didn't want to try sewing through hardened hot glue. Here are two completed maple leaves mounted on snap clips....
 
 
The small aventurine beads help to obscure raw edges at the base of the leaves.
 
So, this is just one way to accomplish a Japanese maple leaf! We would LOVE to hear from you about the way you like to do it. Sharing ideas is what promotes progress, right?


Monday, August 27, 2012

Kanzashi Roses


I am a cat. I have no opposable thumbs. I really don't have any thumbs at all, so I can't draw pictures for you, but I can try to tell you how to make a kanzashi rose.

Cut a square of fabric; silk, cotton, linen, even synthetic, as long as it is lightweight and not too slippery. Try to measure it accurately; you'll thank yourself later. It's important that you cut it with the grain. Don't cut on the bias, OK? I think solid-colored fabric works best for this particular item.

Fold a corner to the opposite corner to make a triangle. Repeat. You now have a triangle-shaped petal (the rudiment of several other kinds of petals). Helen likes to fold in the corners a little (so you won't see raw edges) and baste the thing together. You can also glue it. Make four really small ones, and then three that are 1/4 inch bigger, three 1/4 inch bigger than that, and so forth, depending on how big you want your roses. So, let's say you are cutting squares that are 1.5 inches, 1.75 inches, 2 inches, etc. Whatever your largest squares are going to be, cut 5 or 6 of them. Again, 4 of the smallest ones, 3 of everything else, except the largest ones, which should be 5 or 6. So, Helen's larger roses usually have a total of 15-16 petals.

Take one of the smallest ones and roll it along its hypotenuse so that it resembles the center of a rose.....you can glue it this way (see photos below). Glue the remaining small ones around the center so that it surrounded as evenly as possible on all sides. Repeat with the next largest petals. At some point you might want to glue the petals so that they lie flatter, spreading out your rose. That's pretty much it. Your flower will resemble an angular hybrid tea sort of rose. For a softer, rounder effect, you need to use a different sort of petal, and Helen hasn't even tried that yet.

Here are some of Helen's roses: the first one is silk crepe with vintage kimono silk lining leaves on a comb https://www.etsy.com/listing/105026803/ivory-flower-fascinator-kanzashi-rose ...


And this one is a synthetic amazing reddish purple one that Helen sold to a colleague she spent some time with at a big orchestral musician pow-wow conference www.icsom.org/ in Chicago last week.....


Here's a gold satin rose on a barrette with black satin leaves, both synthetic fabrics....note the onyx bead in the center https://www.etsy.com/listing/58803424/black-gold-hair-barrette-kanzashi-satin ......


Here's a red synthetic one that became a brooch for a gallery....


And finally, here's a pair of coral silk charmeuse snap clips.....


Buy the coral clips here https://www.etsy.com/listing/100582370/coral-flower-hair-clip-fascinators-silk  and there's a rose brooch made from the same fabric here.

So there's your little tutorial. It's probably the only one you're going to get, because you know, I can't draw you pictures, and I can't help Helen take photos. It's hard not having thumbs.